
An office strip-out succeeds when the floor, building and outgoing materials are treated as one controlled project. Start by defining what must leave, what must remain, who can disconnect fixed elements and when each zone becomes available. That scope protects business continuity and gives the building team enough detail to approve access.
Define what “strip-out” means for this floor
The term can describe very different jobs. One tenant may be removing loose furniture and storage before a lease handover. Another may need partitions, flooring, counters or fitted joinery removed after specialist disconnection. Write a room-by-room schedule instead of relying on the phrase alone.
Separate loose contents, reusable assets, confidential material, fixed fixtures and building-owned elements. Mark anything that stays. Confirm who owns meeting-room screens, access-control equipment, data cabinets, blinds, kitchen appliances and reception features. A removal crew should not be asked to make ownership decisions after work begins.
Record the required end condition. “Clear the office” might mean empty rooms, removal to an agreed boundary, or preparation for another contractor. It does not automatically include making good, electrical isolation, plumbing work, ceiling repair or final cleaning. Each responsibility should have a named party and completion point.
Build a scope that can be surveyed
Create an inventory by zone. Count desks, chairs, cabinets and boxed contents, then describe large or unusual pieces individually. Include dimensions where an item may not pass through a doorway or service lift. Photograph wide views, access points and fixed details rather than sending only close-ups of furniture.
If the project also includes storage or distribution space, keep that scope separate and use the warehouse-clearance plan for stock boundaries, staging bays and loading operations. The office inventory should not absorb warehouse material as an unspecified extra.
Walk the proposed route from every work area to the loading point. Note glass doors, narrow turns, raised floors, steps, lift dimensions, loading-dock height and distance to the vehicle position. State whether other tenants will use the same corridor and lift during the work.
Identify dependencies before requesting a final programme. Fixed electrical equipment may need a qualified contractor. Refrigeration, plumbing, fire systems, specialist glazing and building controls should remain outside a general removal scope unless the responsible contractor has confirmed the work. The clearance plan begins after those boundaries are understood.
The commercial junk removal service can be scoped around the agreed loose contents and cleared materials. Send the complete inventory and access conditions so the crew, vehicle capacity and sequence reflect the actual floor rather than a rough estimate.
Plan the strip-out in phases
A phased plan reduces disruption and prevents cleared material from blocking active areas. Divide the floor into zones that can be released, checked and closed in a logical order. The best sequence usually starts away from the main exit and keeps one continuous route available.
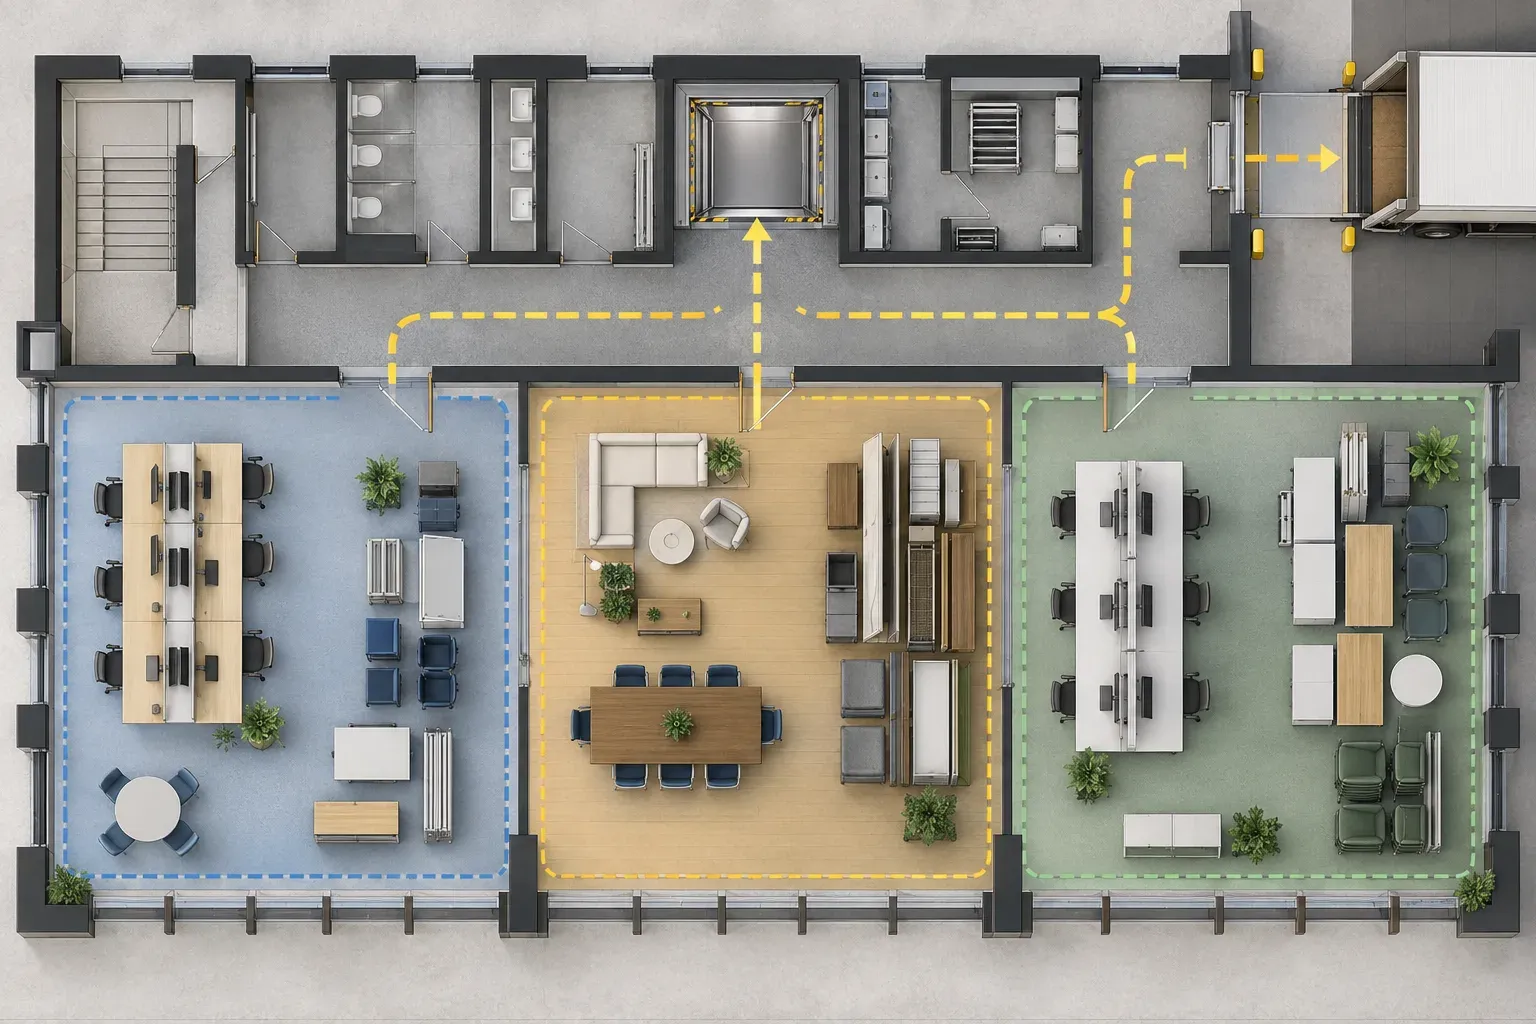
For each zone, list the prerequisite, start condition and handover condition. A work area might begin only after staff have removed personal belongings and IT has released equipment. It may finish when loose furniture and approved fixtures are gone, hardware is contained and the route is swept.
Avoid opening every zone at once. Mixed piles make ownership harder to verify, consume working space and increase the chance that an item crosses into the wrong stream. Complete a zone, compare it with the inventory, then release the next one.
Keep a change log. If a department adds storage, a landlord excludes a fixture or another contractor misses a disconnection, record the effect on the scope and programme. One authorised project contact should approve changes so the site team is not working from conflicting messages.
Protect continuing business operations
Decide whether the office will remain occupied during any part of the work. If it will, separate staff and removal routes as far as possible. Keep reception, washrooms, fire exits and essential facilities available. Do not let temporary staging consume circulation space needed by occupants.
Schedule noisy dismantling and repeated trolley movement around the building’s permitted hours and the tenant’s critical periods. Meetings, customer visits, deliveries and cleaning all compete for the same access. A useful programme shows when each activity owns the route rather than assuming they can overlap.
Tell staff exactly when a zone becomes unavailable and what they must remove. Personal items, live files and equipment should be cleared before the crew enters. Labels need a simple shared meaning: remove, retain, transfer or decision pending. Anything pending should stay outside the active work zone.
Protect data and keys. Lock confidential paper in an approved process; do not mix it with general office waste. Return access cards and cabinet keys to the nominated manager. Data-bearing equipment should follow the organisation’s authorised IT route, because general clearance does not establish secure data destruction.
Coordinate with building management
Ask for the building’s contractor process early. Commercial properties may request insurance details, worker identification, risk documents, method statements, vehicle information or a permit. Requirements vary, so use the written instructions for the actual building and project.
Confirm permitted working hours, service-lift reservations, loading-bay slots and protection standards. Find out who installs lift padding, who controls access and how long security check-in takes. A booked slot should include registration and travel, not only carrying time.
Clarify restrictions on noise, dust, drilling and fixed-work activity. A general clearance booking does not override property rules or authorise alterations. If another contractor handles disconnection or demolition, align their permit and handover with the removal schedule.
Provide the building contact with one programme and vehicle plan. Last-minute arrivals by unregistered vehicles can waste the approved window. If the load needs several trips, state that when booking the bay rather than assuming continuous access.
Control the route and loading area
Inspect the route immediately before work. Remove deliveries, bins and temporary furniture. Protect vulnerable finishes according to the building’s requirements without narrowing doors or covering safety equipment. Keep emergency exits, fire doors and lift controls clear throughout.
Use a defined internal staging area only when it genuinely helps the sequence. It should be inside the approved work boundary, stable, supervised and away from exits. Do not fill a common corridor in anticipation of the vehicle.
At the loading point, separate pedestrian movement from trolley and vehicle activity. Confirm ceiling height, dock leveller use, ramp gradient and parking duration. The vehicle must use an authorised position without blocking emergency or neighbouring access.
Load order matters. Long panels, fragile glass, cabinets and compact boxes require different positions. Tell the provider about unusually long or heavy sections during the survey so they can be incorporated into vehicle and handling plans.
Separate material before removal
Create practical streams based on ownership and destination, but avoid promising a reuse or recycling outcome that has not been confirmed. Reusable furniture needs an identified recipient, condition agreement, dimensions and collection responsibility. Interest from a staff member is not a completed transfer.
Keep metal frames, timber panels, mixed furniture, packaging and general contents organised where the provider requests. Do not mix liquids, batteries, pressurised containers, lamps, chemicals or unknown substances into a normal load. Raise them during the survey so the correct route can be agreed.
Fixed components should be made safe before they enter the removal stream. Exposed cables, sharp brackets and unstable glass need attention from the responsible trade. General crews can handle agreed loose materials; they should not inherit an unsafe condition created by incomplete specialist work.
If the project produces material over several days, coordinate the removal rhythm with the strip-out sequence. The skip-hire comparison explains how duration, placement and loading labour change the choice between a container and direct collection.
Survey fixed elements carefully
Partitions, worktops, cupboards and fitted reception units often connect to walls, floors, services or neighbouring finishes. Photograph their junctions and confirm who has authority to detach them. Do not assume a visible screw means the entire assembly is free-standing.
Check above and below the visible surface where authorised. Raised-floor pedestals, floor boxes, ceiling grids and concealed cables can change the method. If a specialist needs to isolate services, obtain that confirmation before removal day.
Glass deserves its own plan. Record panel dimensions, edge condition and access. Framed glazed partitions may require specialist dismantling and transport. Broken or cracked glass should be disclosed rather than placed behind other material.
The handover specification decides how far the work goes. Removing a partition may expose unfinished surfaces; removing flooring may leave adhesive. Agree who deals with those conditions. A clear boundary prevents a removal booking from being mistaken for full reinstatement.
Price from a complete scope
A useful quote describes quantities, access, labour assumptions, dismantling boundaries, vehicle requirements and accepted material. It should also state exclusions and how changes are approved. Comparing totals without comparing scope can hide the main differences.
Volume is only one variable. Carry distance, lift availability, loading restrictions, panel length, segregation and phasing affect resources. Work spread across several short building slots may require more mobilisation than the same volume handled in one continuous window.
Send bidders the same information and ask the same questions. Confirm whether route protection, basic dismantling, loading, agreed disposal and sweep-up are included. Ask what happens if the inventory increases or the building changes the access window.
Do not invent an allowance for uncertain fixed work. Request a survey, isolate the uncertain element and price it after the responsible contractor confirms the condition. That is more reliable than hiding a major assumption inside a general figure.
Prepare the office before the crew arrives
Freeze the inventory at an agreed point and distribute the final version. Remove personal possessions, confidential material, live IT and retained equipment from active zones. Label retained objects and give the site lead authority to resolve questions.
Confirm that specialist disconnections are complete and documented. Clear the route, reserve access, notify reception and verify the loading position. Keep keys, cards and permits with the project contact instead of packing them into a box.
Plan deliveries and cleaners after the expected removal finish, with a buffer. New furniture arriving through the same lift can stop both teams. Final cleaning cannot work effectively while panels and hardware still cross the floor.
Use a short arrival briefing. Walk the zones, identify exclusions, point out route hazards and confirm the loading sequence. The crew should understand the same scope that management approved.
Check completion zone by zone
Inspect each released zone against the schedule rather than waiting until the vehicle leaves. Check cupboards, meeting rooms, stores and kitchen areas. Confirm that retained items remain protected and that no loose hardware or sharp pieces are left.
Review the common route and loading bay with the relevant building contact where required. Remove temporary protection, return lift controls and report any issue promptly. Keep photographs of the agreed completion condition for the project record.
Record exceptions instead of hiding them. An excluded fixture, inaccessible room or item awaiting specialist treatment should appear on a close-out list with an owner and next action. The strip-out is complete when the documented scope is complete, not merely when the main floor looks empty.
Office strip-out checklist
- Define the required end condition and exclusions.
- Confirm ownership of fixtures, furniture and equipment.
- Inventory the floor by zone with useful photographs.
- Identify specialist disconnection and fixed-work boundaries.
- Agree building permits, hours, lift and loading access.
- Phase work so one protected route stays open.
- Separate retained, transferable and removable assets.
- Keep confidential material and data equipment in approved processes.
- Price from one complete scope and record changes.
- Inspect and sign off each zone before close-out.
Questions to settle before approval
Can an office remain occupied during a strip-out?
It can remain partly occupied only when the building, employer and project leads have agreed safe separation, permitted hours and working routes. Staff should not share an uncontrolled dismantling or trolley path. Release isolated zones in sequence and keep essential facilities and exits available.
Is removing furniture the same as reinstating the floor?
No. Furniture and agreed loose-material removal has a different boundary from disconnection, demolition, making good, decoration and final cleaning. The lease or handover specification should be translated into named work packages so each contractor knows where its responsibility ends.
When should the clearance provider survey the office?
Arrange the survey after the intended end condition is known but before building slots and vehicle access are finalised. The provider needs to see quantities, fixed-work boundaries and the complete route. Repeat or update the survey if the inventory or access conditions change materially.
Who should approve last-minute changes?
Nominate one client representative with authority over the inventory and budget. Site staff can identify a problem, but the authorised contact should decide whether an item is added, excluded or deferred. Record the decision in the shared scope before the item moves.
A controlled office strip-out is a sequence of decisions, not a single removal event. Define the boundary, release zones in order and coordinate the building route before work begins. That gives the business, landlord, contractors and clearance crew one practical version of what completion means.