
Retail fit-out waste removal should begin only after the project team has separated retained assets, reusable stock, loose clearance items and released fit-out material. Name who can approve each group, confirm that technical disconnections are complete, stage the load without blocking the premises, and book removal against the building's access window.
“Fit-out waste” is not one material. A retail unit may contain shelving, counters, display plinths, signage, packaging, timber offcuts, metal frames, cables, lighting, glass, floor coverings and general rubbish. Some are loose items, some are landlord property, and some remain part of the installed shop until a contractor safely releases them.
Establish authority before the strip-out creates a pile
Identify the person who can approve disposal. This may be the retailer, project manager, main contractor, landlord representative or another named contact. Put that authority in writing and agree how changes will be recorded.
Start from a marked drawing, room list or simple zone plan. Divide the unit into sales floor, fitting rooms, back office, stockroom, pantry, storefront and service area as applicable. For each zone, record what stays, what moves to another site, what returns to a supplier, what is held and what is cleared.
Do not rely on verbal instructions such as “everything after closing.” A retail unit can contain leased equipment, reusable display systems, landlord fixtures and stock that resembles waste after it is boxed. A removal crew should receive an approved inventory, not make asset decisions while loading.
Freeze assets and stock first
Complete an asset check before dismantling. Separate point-of-sale equipment, screens, routers, payment devices, printers, security hardware, safes, keys and data-bearing equipment. Record serial or asset numbers when the business requires them and move retained equipment to a controlled zone.
Stock, samples, uniforms, branded packaging and marketing material also need an owner decision. Do not place them in a mixed removal pile because a launch, refit or closure deadline is close. If another department must approve their destination, hold them until that approval arrives.
The shop-clearance guide covers retail stock and asset control for a general handback. A fit-out waste plan goes narrower: it manages the material released by installers and strip-out contractors without confusing it with the shop's remaining business assets.
Separate loose clearance from installed fit-out
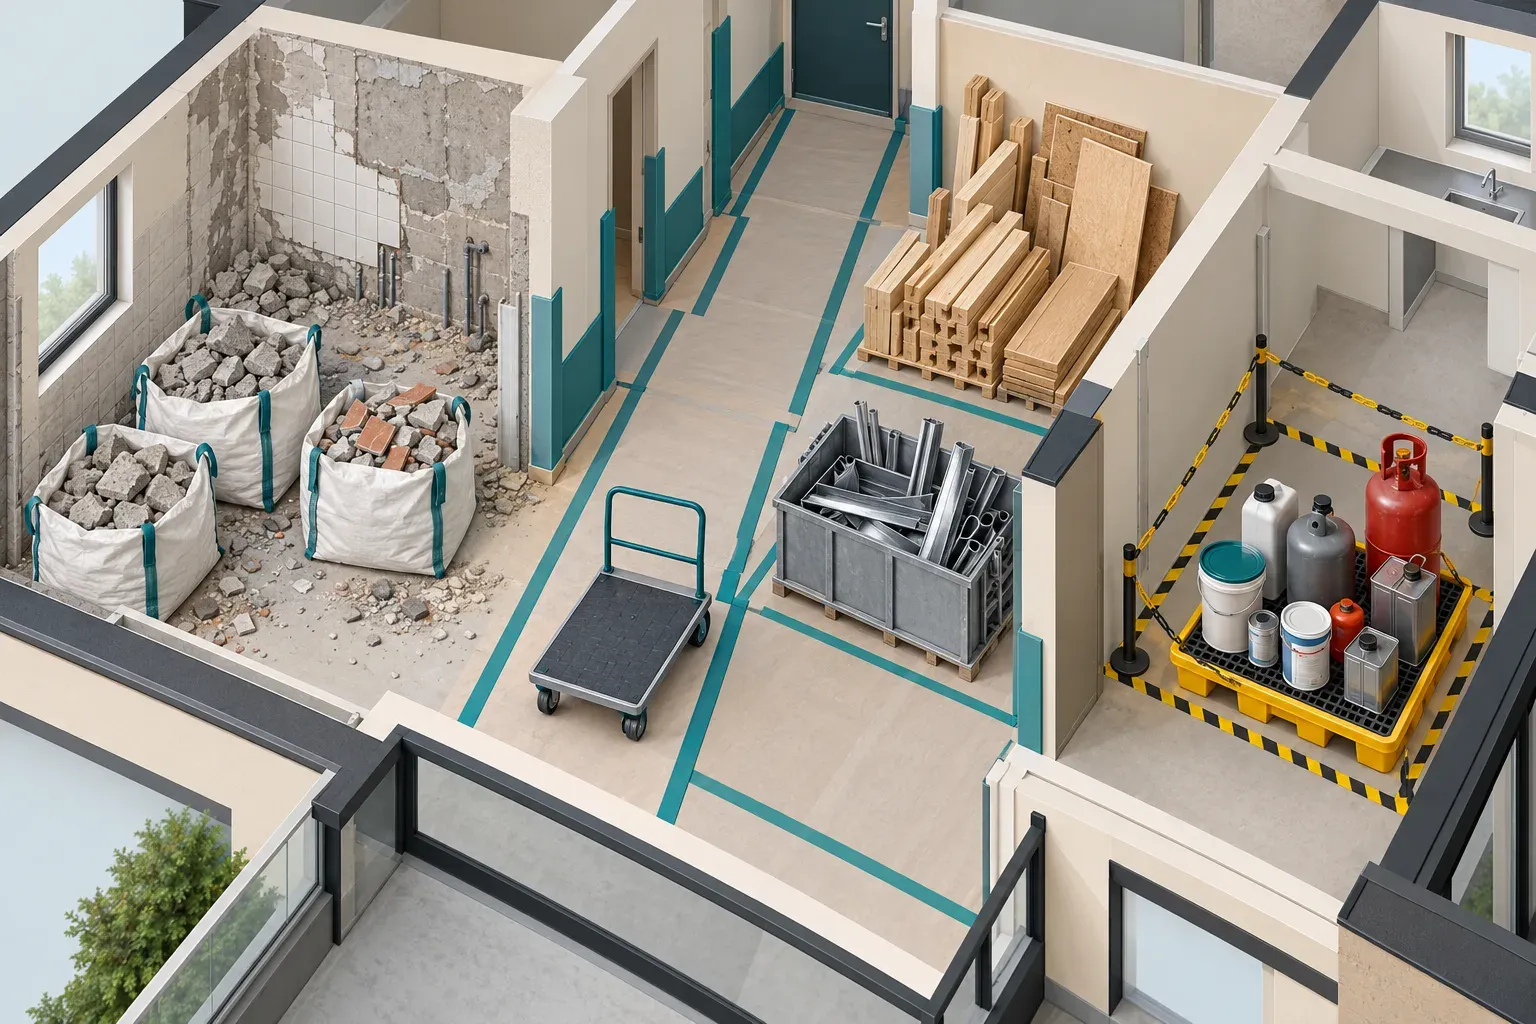
Create a boundary between items a collection crew can carry and components that remain fixed. Loose chairs, freestanding shelves, boxes and packaging can be inventoried as collection items. Counters attached to the floor, wall panels, wired lighting, plumbing, fixed signage and built-in joinery need the responsible contractor to assess and release them.
Do not assume that visible screws make an installation safe to remove. A counter can conceal power or data cables; a display wall can carry lighting; a sink unit can remain connected to water and waste. Technical isolation, disconnection, demolition and making-good stay with the appropriate project trade unless an agreed scope says otherwise.
Record the handoff for every fixed group:
- Who owns or controls the installation.
- Who confirms it may be removed.
- Which contractor disconnects or releases it.
- When the loose material becomes available for collection.
- Whether sharp edges, glass or protruding fixings remain.
- Who signs off the empty location afterwards.
This prevents a collection team arriving while carpentry, electrical or plumbing work is unfinished. It also keeps the quote tied to a real loose load rather than an assumed strip-out scope.
Distinguish removal from demolition
Taking away released shelving is different from demolishing it in place. Carrying loose carpet rolls is different from lifting bonded flooring. Loading disconnected light fittings is different from isolating a circuit. Use precise verbs in the scope so every contractor understands where their job ends.
If cutting or dismantling is required only to fit released material through the route, identify the exact pieces and agree responsibility. Do not let “break it down if needed” expand into uncontrolled demolition of the unit.
The office strip-out guide offers a useful phasing model for fixed and loose commercial interiors. Retail work adds stock, storefront and trading-hour constraints, but the same boundary applies: release first, collect second.
Sort fit-out material into visible groups
Ask the strip-out team to keep materials separate as they work. A mixed pile hides sharp edges, makes quantities difficult to assess and can combine acceptable items with liquids or unknown components.
Useful groups include:
1. Timber and board from released joinery or displays. 2. Metal frames, rails, brackets and shelving. 3. Glass and mirrors, intact or broken and safely controlled. 4. Rolled flooring, underlay and loose ceiling material. 5. Electrical and electronic items after proper disconnection. 6. Cardboard, clean wrapping and other packaging. 7. General loose rubbish from the works. 8. Liquids, chemicals, adhesives and unidentified containers held aside.
Label the zones and keep retained materials physically apart. Colour coding can help, but it must be supported by a written key. A red sticker has no meaning if the contractor thinks it means remove and the store manager thinks it means retain.
Keep sharp, dusty and fragile material controlled
Remove or bend back protruding nails and screws only where the responsible trade can do so safely. Stack panels so they cannot slide. Keep broken glass and mirrors in a clearly identified, suitable container, and disclose them before collection.
Dusty material should not be mixed through packaging, stock or soft furnishings. If the project produces dust, residue or loose fragments, confirm who contains and cleans them. A removal booking is not a substitute for site controls or final cleaning.
Do not bag chemicals, solvents, paint, adhesives, aerosols or unlabelled liquids with ordinary fit-out waste. Keep original labels visible and obtain an acceptance decision for each type. If the contents are unknown, isolate the container rather than guessing.
Measure the released load after each phase
Quote from what is actually available, or from a controlled bill of quantities that the project team will honour. Wide photographs of each group are more useful than close-ups that conceal scale. Add counts for panels, rolls, frames, bags, boxes and loose fixtures, plus the dimensions of the longest or widest pieces.
For a phased refit, issue an update at the end of each work package. Joinery removal may produce one load; flooring and signage may follow later. Trying to price the entire project from a photo taken before strip-out transfers uncertainty to the collection day.
A change log can be simple:
- Date and phase completed.
- New groups released for collection.
- Items removed from or added to the approved scope.
- Updated counts and wide photographs.
- Access window for that load.
- Name of the person approving the update.
If the material volume may change, say so and agree when the final confirmation is due. Never conceal the uncertainty inside a phrase such as “approximately one shop.”
Do not use floor area as the only quantity
Two units with the same floor area can create very different loads. One may reuse its ceiling, flooring and displays; another may release dense joinery and long metal frames. Quantity follows the approved design and strip-out scope, not square metres alone.
Record material type and form. Stacked panels, nested metal frames and loose mixed offcuts occupy different space and require different handling even when they came from the same wall.
Plan staging without blocking the retail unit
Choose a staging area that keeps exits, fire equipment, neighbouring units and shared corridors clear. Confirm it with the property or project contact. Do not move material into a mall corridor, loading bay or common service area simply because it is convenient.
Inside the unit, preserve one continuous route from the work zones to the exit. Keep retained assets away from that route and protect completed finishes from the next load. If contractors are still working, schedule collection when their activity will not cross the carrying path.
For an operating store, decide whether the collection happens outside trading activity or behind a secure separation. Do not make promises about hours or access without current approval from the building or centre management. Policies vary by property and project.
Coordinate lifts, docks and security
Map the route beyond the shopfront: back-of-house corridor, goods lift, service yard, loading dock, vehicle checkpoint and parking position. Record door and lift dimensions for long counters, frames or panels. Note floor changes, ramps and tight turns.
The authorised property contact should confirm the current access process, contractor documents, vehicle details and booking window. A previous delivery slot does not prove that waste removal uses the same route or permission.
Share confirmed access information with the removal provider before dispatch. If the slot is short, make sure the load is released, counted and staged before it begins. Time should not be consumed waiting for asset approval or technical disconnection.
Protect data, branding and business records
Separate paperwork, labels, customer information, staff records and data-bearing devices from physical fit-out waste. A collection provider should not be expected to decide what is confidential or erase equipment. The business must apply its own information-handling process before items enter the removal zone.
Branded signage, uniforms and packaging may also require controlled handling. Decide whether logos must be removed, material returned or another documented process followed. Do not imply a secure destruction or data-erasure service unless it has been specifically arranged and confirmed.
The IT-equipment disposal guide explains the boundary between physical collection and data responsibility. Use it before monitors, computers, storage devices or network equipment are added to a fit-out load.
Handle landlord and leased equipment separately
Confirm the status of air-conditioning controls, fire and security equipment, shutters, doors, lighting, kitchen equipment and communications hardware. Some belong to the landlord or service provider even when they appear to be part of the retailer's installation.
Create a hold tag for anything awaiting confirmation. The project deadline does not transfer ownership. A signed decision from the authorised party is the safe trigger for release.
Sequence collection with the fit-out programme
Place removal milestones in the project schedule. A useful sequence is asset freeze, technical isolation, contractor release, material sorting, quantity confirmation, access approval, collection and zone sign-off. Each step should have an owner.
Avoid booking the final collection for the exact moment the strip-out is supposed to finish. Unfinished work, late approvals or added material can make the agreed load inaccurate. Build a confirmation point into the schedule without inventing a universal lead time; the practical window depends on the property and project.
Where several contractors share the site, name one coordinator for the collection. Conflicting instructions from a store manager, carpenter and landlord representative should be resolved before the crew starts loading.
Keep new fit-out deliveries separate
New fixtures, boxed equipment and installation materials can resemble the outgoing load. Give them a protected delivery zone and clear labels. Do not stage waste in front of unopened boxes or use new packaging as general rubbish containers.
If delivery and removal use the same dock or goods lift, put them in a confirmed order. Keeping the flows separate reduces congestion and helps prevent a retained or newly delivered item from being loaded by mistake.
Send a commercial quote pack
Provide one organised package rather than disconnected messages from several contractors. Include the authorised contact, zone plan, released-item inventory, material groups, photographs, dimensions, access confirmation and project timing.
The pack should state:
- Store or unit reference and the collection zones.
- Who owns the disposal decision and who will be on site.
- Retain, return, hold and remove groups.
- Which fixed items will be released, by whom and when.
- Counts and dimensions for each material group.
- Glass, sharp, dusty, liquid or unusually dense material.
- Data-bearing, branded or confidential items kept outside the general load.
- The internal route, goods lift or dock details and vehicle position.
- The confirmed access window and any dependency on another contractor.
- The required sign-off record after collection.
This lets a commercial junk removal service assess the loose, approved collection scope. It does not transfer demolition, technical isolation, asset control or project management to the collection crew.
Sign off by zone and material group
After loading, inspect every zone against the approved list. Confirm that held and retained assets remain, loose fit-out waste has left, and no new installation material was taken. Photograph cleared staging areas and unresolved items.
Record any material left because it was fixed, unapproved, unsafe, unidentified or outside the accepted scope. Assign the next action to the correct project party rather than treating it as a silent failure of the collection.
A clean handover record includes the date, approving contact, zones checked and exceptions. It supports the project team without making claims about regulatory disposal documents or downstream destinations that have not been specifically established.
Common questions
Can the removal crew dismantle the whole shop fit-out?
Do not assume so. Fixed joinery, wired equipment, plumbing, flooring and other installed elements should be assessed and safely released by the responsible project trade before collection unless a different scope is expressly agreed.
Can stock and displays go in the same load?
Only after ownership and destination decisions are clear. Keep stock, retained displays, returns and removal items in visibly separate groups so the crew is not asked to make asset decisions.
When should the collection be quoted?
Use the released load after a completed phase, or a controlled inventory that the project team will keep accurate. Update photographs and counts whenever the strip-out scope changes.
What information is needed about building access?
Confirm the authorised route, goods lift or dock booking, vehicle process, approved window and on-site contact directly with the property. Share that confirmation before the crew is dispatched.
What is the clearest first step?
Freeze assets and stock, define the fixed-versus-loose boundary, and name the person who can release each material group. Once those decisions are visible, the collection can be measured and scheduled accurately.